If you’re just getting started in Android app development, you may or may not know of Android Studio. It’s Google’s official IDE (integrated development environment) made specifically for developing native Android apps. For Java or Kotlin Android apps, there’s no better option in terms of ease of development.
Of course, Android Studio is a development tool, so it’s not exactly a plug-and-play installation for your preferred development platform. There’s a little manual setup required, and that’s where this article comes in. Today, we’re going to go through installing and setting up Android Studio on Windows, macOS, Linux, and Chrome OS. Let’s get started!
Download Android Studio
This may be the most obvious step, but I’m including it here anyway for easy access. Before you can actually use Android Studio, you’ll need to download the appropriate version for your system. Follow the link below and download the appropriate file for your device.
Install Android Studio
Now comes the fun part. Follow the section below for your operating system to get Android Studio installed.
Windows
Windows actually has a couple of ways to install it.
Method 1
If you just want an easy installation, you can download and run the installer EXE. You’ll be guided through installing Android Studio, and then you’re done!

Just download the EXE and run it.
Method 2
This method is a bit more involved, but if you don’t have administrator access on your computer, this is the better choice. Let’s start.
- The first thing to do is to download Android Studio. Grab the ZIP version for Windows.

Download the ZIP for Windows.
- While that’s downloading, make a folder for where you want to store Android Studio. For instance, my installation is located at E:\AndroidStudioDevWin\.
- Next, open up the ZIP you downloaded. Inside, you should see a folder called android-studio. Go into that folder and you should see a whole bunch of folders and files, including bin, jre, and uninstall.exe. These are the files you’re going to extract.

You should see something similar to this.
- Open a new File Explorer window and navigate inside of the folder you created in step 2. In my case, that’s E:\AndroidStudioDevWin\.
- Back in the ZIP window, select all the folders and files and drag them to the window you opened in step 4.

Extract the files into the folder you created for Android Studio.
- Once the extraction is complete, you can delete the ZIP if you want.
- Now, go into the bin directory and find the studio64.exe file. Right-click and choose the Pin to taskbar option. Right-click again and choose the Pin to start option.
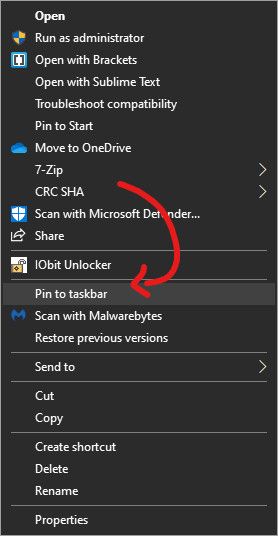
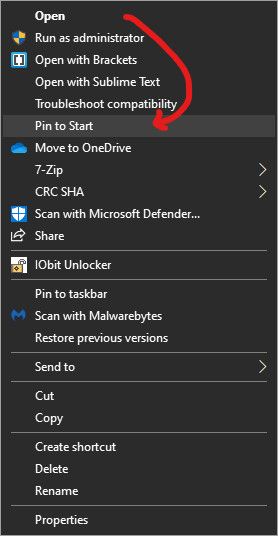
And that’s it! You should be able to search for “studio” in the Start Menu or simply click on the Android Studio icon in the taskbar to run it.
macOS
Follow these steps to install Android Studio on macOS:
- Download the Android Studio DMG for Mac.

Download the DMG for Mac.
- Open the downloaded DMG. A window with the Android Studio icon and a shortcut to the Applications folder should open. If you’ve installed third-party apps on macOS before, this should look pretty familiar.

You should see something like this when you open the DMG.
- Drag the icon to the Applications folder shortcut and let it copy.
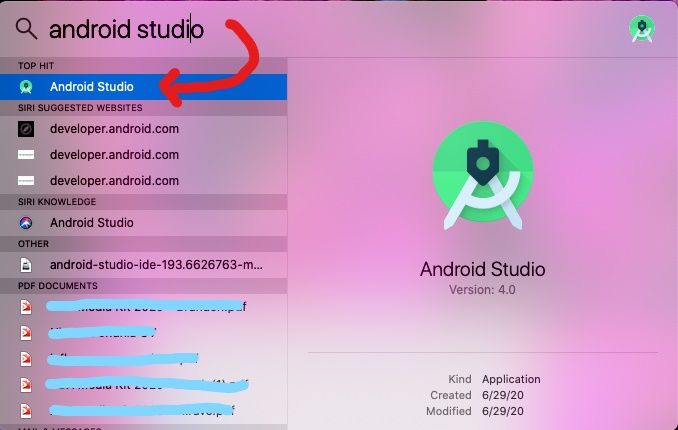
Once the copying has finished, you can open Android Studio by searching for it in Spotlight (CMD+Space) or Launchpad (Fn+F4).

Linux
There are quite a few Linux distributions out there, and these instructions can’t cover them all. We’re going to be talking specifically about Debian-based and Fedora-based distributions here, but the general instructions should apply to all distributions.
- First up, you’ll need to download the Android Studio TAR.GZ for Linux.

Download the TAR.GZ for Linux.
- The second thing you’ll need to do is create a directory where it should be installed. For instance, it could be at /home/zachary/Desktop/AndroidStudio/.
- Next, open up the TAR.GZ archive you downloaded. You should see a folder called android-studio. Go into that folder and you should see a whole bunch of folders and files, including bin, jre, and product-info.json.

You should see a bunch of files in the ZIP, like this.
- Open a new Files window and navigate into the folder you created in step 2. In my case, it’s /home/zachary/Desktop/AndroidStudio/.
- Back in the Archive Manager window, select all the folders and files and drag them into the window you opened in step 4. Once the extraction is complete, you can delete the TAR.GZ if you want.
- While the files are copying, open a terminal (Ctrl+Alt+T). We need to make sure some libraries are installed so Android Studio can run.
- On Debian-based distributions, run:
sudo apt-get install libc6:i386 libncurses5:i386 libstdc++6:i386 lib32z1 libbz2-1.0:i386 - On Fedora-based distributions, run:
sudo yum install zlib.i686 ncurses-libs.i686 bzip2-libs.i686 - On other distributions, you’ll need to find and install these libraries using the appropriate package manager.
- On Debian-based distributions, run:
- Once the extraction is finished, go into the bin directory in your installation directory. Inside, you should see a file named studio.sh.
- Right-click on an empty space in the window and choose the Open in Terminal option.

Choose “Open in Terminal”
- Once the terminal window opens, run the following command:
./studio.shThis will open Android Studio.
Now you’ve got Android Studio installed! If you want to make it easier to open, you can try making a desktop entry. Follow the instructions below to do so.
- Right-click on your desktop and choose Open in Terminal.

Choose “Open in Terminal”
- In the terminal window, run:
touch AndroidStudio.desktopClose the terminal.
- Open the AndroidStudio.desktop file in a text editor, like Gedit, and paste the following:
[Desktop Entry] Name=Android Studio Exec=/home/zachary/Desktop/AndroidStudio/bin/studio.sh Icon=/home/zachary/Desktop/AndroidStudio/bin/studio.sh Type=Application Terminal=False Categories=Utility; - You’ll need to change the paths after Exec= and Icon= to match your paths.

Your desktop entry should look something like this.
- Save, and then right-click AndroidStudio.desktop. Choose the Allow Launching option. This may not be necessary for all distributions.

Select the “Allow Launching” option.
- Finally, double-click the file to launch Android Studio.
Chrome OS
If you’re on Chrome OS or some variant of Chromium OS, you’re in luck, because Google has made Android Studio available through the Linux framework. Read on to find out how to get Android Studio up and running on Chrome OS.
Installing Linux
Before you can install Android Studio on Chrome OS, you’ll need to install Linux. This isn’t a dual-boot situation, though, so don’t worry. Google has added a feature to Chrome OS to run Linux apps without having to install Ubuntu/Arch/etc. and reboot. If you already have Linux on Chrome OS enabled, you can skip this section.
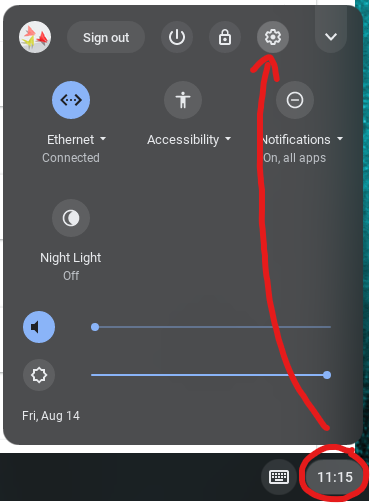
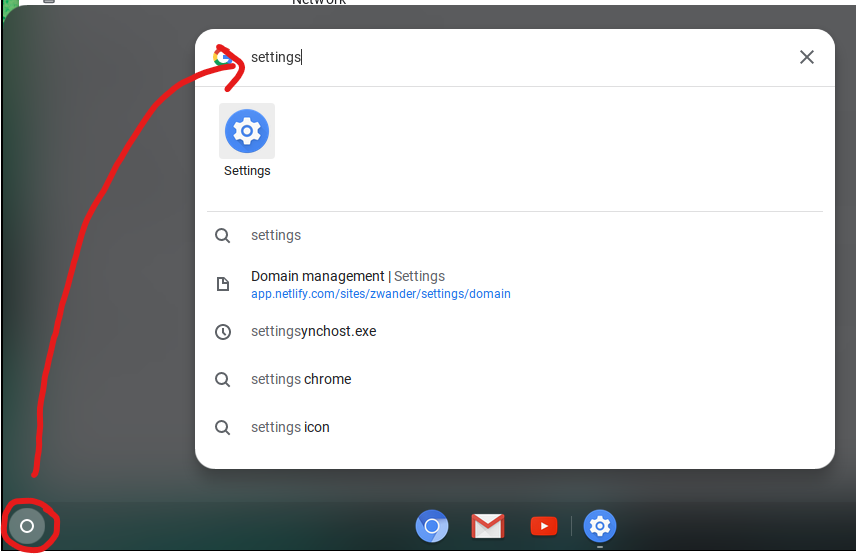
- Open Settings. You can do this by clicking the time in the bottom right of the screen and then clicking the gear icon, or by opening search (the circle in the bottom-left) and searching for Settings.
- In the left sidebar, click Linux (Beta) or scroll down to the bottom of the Settings window.
- Click the Turn on button in the Linux card.

Click “Turn on” to enable Linux.
- At this point, a window should pop up telling you how much space Linux will take up. Click Next.

Click “Next”.
- On the next screen, specify a username for the Linux installation, and then click Install.

Click “Install”.
- Wait a few minutes for the installation to finish. A terminal window will appear. Close it.
If everything went well, you should now have Linux enabled on Chrome OS!
If you don’t see the Linux option in your settings, it likely means your Chromebook doesn’t support it. Most Chromebooks launched in 2019 or later support it, while some launched before 2019 support it. You can find a full list of such devices here.
Installing Android Studio
Now that you have Linux enabled, it’s time to install Android Studio.
- Download the Android Studio DEB for Chrome OS.

Download the DEB for Chrome OS.
- Open Files and navigate to the Downloads folder.
- Right-click the downloaded DEB and select Install with Linux (Beta).

Click “Install with Linux”.
- In the window that pops up, wait for the details to load, and then click Install.

Click “Install”.
- You’ll get a notification telling you the progress of the installation. This might take a bit.
- Once the installation is finished, you’ll be able to find Android Studio right in the launcher in the Linux apps folder.

Android Studio will be in your apps launcher inside the “Linux apps” folder.
That’s it! Setting up Android Studio on Chrome OS isn’t exactly simple, but it’s at least fairly straightforward.
Hopefully, this guide helped you get Android Studio set up on whichever operating system you may be using.
The post Android App Basics: How to install Android Studio on Windows, macOS, Linux, and Chrome OS appeared first on xda-developers.
from xda-developers https://ift.tt/323DhJx
via IFTTT
Aucun commentaire:
Enregistrer un commentaire